
Posted on — Leave a comment

The Story of Rosemary & Bergamot

We’ve come a long way since we started, but one thing that hasn’t changed is the popularity of our Rosemary & Bergamot! We’ve been reminiscing (and cringing!) about our origins today, and thought we’d share the story of our signature scent.

Back in 2003, when we weren’t much more than a shed and our living room, we were approached by The Mill House, who were looking for a company to develop a range of luxury toiletries for their hotel.

At that point we were a relatively new company, making toiletries, food products and herb related crafty items – if you don’t believe how much progress we’ve made, check out this reminder of how we started!

DSCF0001

The team from The Mill House spent a productive morning with us exploring a variety of different scent options, and out of that session came two fragrances- Rosemary & Bergamot and Pine & Lavender (which has since been discontinued). The Rosemary & Bergamot was designed to be totally unisex, and (it has since been discovered) almost universally loved.

Initially we made soaps and hair and body wash for the hotel, but the Rosemary and Bergamot scent proved so popular that we expanded the range to 12 items (and it’s continued to grow even now). It remains our most popular fragrance and is used by many local (and national!) hotels and restaurants, including Jamie Oliver’s Fifteen Cornwall, Nathan Outlaw’s Fish Kitchen, St Enodoc Hotel, Playboy Club London and more…

Often imitated, but never bettered, our Rosemary & Bergamot range is made using the finest ingredients and will leave you feeling refreshed and invigorated. Don’t take our word for it, pop in and have a smell!

bergamot

Posted on — Leave a comment

St Kitts Bhaji Mix Recipe

We don’t have any of our bhaji mix on the shelf at the moment, but we don’t want to leave you without – so by popular request, here’s how you can make it at home!


Bhaji mix ingredients:

200g gram flour

1 tsp garam masala

1 tsp baking powder

water


Method:

Mix dry ingredients together and add enough water to make a batter – you want it thicker than for pancakes, but not stiff.

My favourite bhaji is cauliflower, so I’ll give you the instructions for that. Break cauliflower into florets and put them into boiling water, bring back to the boil then remove from the heat straight away and strain. They will feel like they are too firm, but trust me this will make them perfect. Drop the cauliflower florets into the batter and coat thoroughly. Heat about an inch of oil in a deep frying pan, once it is hot drop the coated cauliflower in and fry, turning regularly, until a golden brown. Drain on kitchen paper and give a sprinkle of salt before serving. Best served hot with a yoghurt dip, or as a side with a curry.


You can also use peas, chopped onions, partially cooked sweet potato… anything you fancy really! They’re also great with salad, if the sun finally comes out and you fancy a quick bite…


Photo credit: mdid via Foter.com / CC BY

Posted on — Leave a comment

Stuffed Mushroom Burger Recipe – Summer in a Bun…

We had an amazing time at our Summer Party this Saturday – great food, great company and incredible music from the very talented ‘Dog With No Name’. We got through a fair bit of Pimms too! As always, a huge thank you to everyone who came! For those that missed it, here is the recipe for our stuffed mushrooms, which we served in burger buns with a bit of roast sweet potato and pepper for flavour contrast.

Ingredients:

– 4 Large flat mushrooms

– 250g Cream cheese

– couple of slices of bread

– 100g strong cheddar, grated

– pinch of dried sage or chives

– salt and pepper to taste

Method:

  • Remove and save the mushroom stalks, scoop out the dark gills with a spoon.
  • Put both of these into a food processor with the bread and herbs and pulse for a few seconds, until crumbed. Mix this with the grated cheese.
  • Generously fill the scooped out mushrooms with cream cheese, top with the breadcrumb mixture, pressing into shape as you go.
  • Bake in the oven at about 170C for 20 minutes, until mushroom is soft and top is crispy. Serve with salad; in a bun or pitta bread; or (my favourite) with some crispy roast parsnips.

If you really want to recreate our evening, you’ll have to check out some of the fab music from Dog With No Name!

Posted on — Leave a comment

Anglesey Eggs

As always, we had a fantastic time at our monthly evening meal! Thank you to everyone who came, we love the community spirit and it’s great fun hosting you all. For those of you who missed it, we had a Welsh theme as a belated St David’s Day celebration, and Susan whipped up her own version of Anglesey Eggs (spoiler alert, they were delicious!). Here’s her recipe so you can give it a go at home…


Anglesey Eggs

 For 4 people

500g potatoes, peeled and chopped

50g butter

4 leeks, sliced

50g butter

50g flour

½ litre milk

mustard powder to taste

bay leaf

150g mature cheddar grated

extra cheese to top, grated

8 hard boiled eggs


– Boil and mash the potatoes.

– Fry the leeks in the butter until tender and then mix into the mashed potatoes.

– Put the potatoes in the bottom of an oven proof dish.

– Quarter the boiled eggs and spread over the top of the mash.

– Melt the butter in a pan, add the flour and mustard and cook until frothy.

– Remove from heat and whisk in the milk a little at a time, add the bay leaf.

– Return to the heat and stir until it thickens.

– Remove from heat and stir in the grated cheese.

– Pour the sauce over the eggs and potato, sprinkle the remaining cheese over the top and put in a hot oven until the sauce is bubbly and brown.


It’s great served with herby bread (we used this Welsh recipe) and maybe even a crunchy salad. Enjoy!


Posted on — Leave a comment

Susan’s Lentil Dahl Recipe

So we had to cancel last week’s meal (booo…) due to illness, but to try and make up for it, we thought we’d give you our recipe so you can try it at home. To me, this meal is Indian comfort food at its best – a real winter warmer, or just as fabulous cold the next day. I recommend eating whilst in your pyjamas!

If Indian food is your thing, take a look at Manjulas Kitchen, for some fabulous recipes (and great watching!).

 Susan’s Lentil Dahl

1 onion finely chopped

1 carrot cut into thin slices

2 large potatoes cut into small cubes

couple of large handfuls of red lentils

½ block of creamed coconut (not milk and not a carton)

1 tsp black or brown mustard seed

1 tsp ground coriander

1 tsp ground cumin

1 tsp turmeric

½ tsp black pepper

1 tsp ground cardamom

1 inch piece of fresh ginger – peeled and finely grated

1 clove garlic crushed (totally optional, I don’t use this at all, but if you like garlic knock yourself out!)

ghee or oil – about two tablespoons

handful of fresh coriander leaves – chopped


Heat the oil or ghee in a large saucepan, when hot drop in the mustard seeds and leave until they start to pop, add the onion and cook until it starts to brown. Add the coriander, cumin, turmeric, pepper, cardamom, fresh ginger and the garlic if using. Cook the spices for a moment or two before adding in the carrots, potatoes and lentils and cook for a few seconds. Add enough water to completely cover everything and bring to the boil. Reduce heat to a simmer and cook until everything is soft, adding boiling water if it needs it. When it is cooked there should still be a good amount of liquid in the pot, now add the block of coconut and stir until it’s is completely dissolved, cook on for a minute or two until it thickens. Remove from heat and stir in the most of the fresh coriander, reserving a little for garnishing. Serve with yoghurt, mango chutney and a chapatti.

We recommend serving with onion (or cauliflower if you’re feeling adventurous) bhajis – check out our easy bhaji mix here.

Photo credit: srqpix via Foter.com / CC BY

Posted on — Leave a comment

Recipe – Gremolata

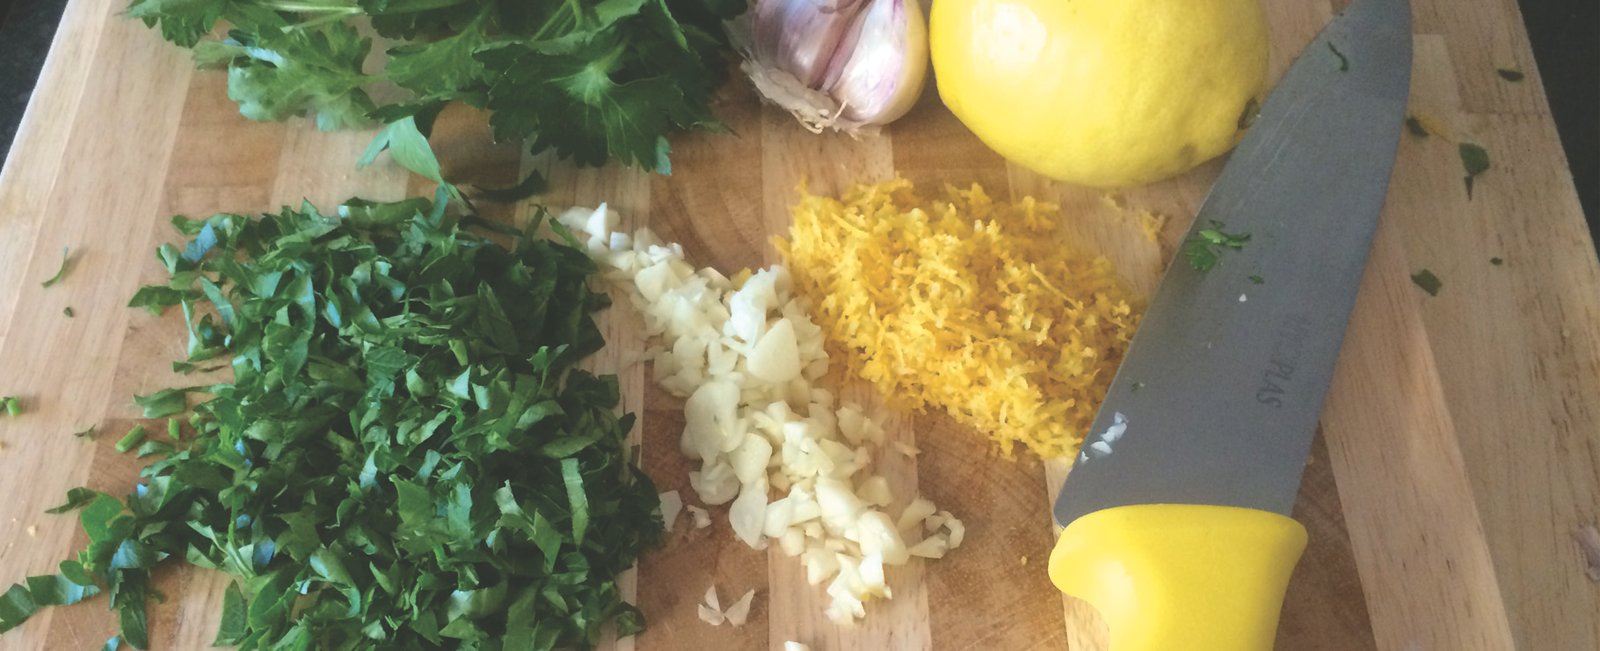
Herbs are often in short supply in the garden at this time of year; however there always seems to be plenty of parsley around! We think that gremolata is a fantastic way to make use of this herb. This super easy and extremely versatile recipe will use up all of that extra parsley you have hanging around, as well as give you a lovely garlic-y hit – always a necessity over winter!

finish-gremolata

Gremolata

Ingredients:

2 cups (500mls) parsley

4 tbsp (60mls) finely grated lemon rind

2 tbsp (30mls) garlic

Chop the parsley and garlic until very fine, if you have a Vitamix this will do the job for you, then mix together with the finely grated lemon rind. This spread can be used in all sorts of ways too; freeze in an ice cube tray and then use to season stews and soups, mix with cream cheese for a delicious cracker spread, use as a garnish or mix with breadcrumbs for stuffing or coating. A personal favourite of ours is mashing with butter, smearing on bread and then toasting in the oven for quick and delicious garlic bread. In a sealed container, kept in the fridge, this spread should last a while so you can have the chance to try it all sorts of ways!  In fact here is a great variation using walnuts.

Posted on — Leave a comment

Sage and Thyme Steaming Treatment

We’ve given ourselves a productive new year’s resolution this year – we’re finally going to get the hang of this blogging business! No more getting distracted, you’re going to be hearing a lot more from us… So to start on the right note (halfway through January, but close enough!) here’s our first ‘make your own’ of the year.

It’s the time of year for dry skin and blocked noses, but we’ve got a super easy, very relaxing way to combat both at the same time. A sage and thyme steaming treatment will open and unclog your pores, whilst clearing your sinuses for easier breathing.

Ingredients:

Handful fresh sage

Handful fresh thyme

Bowl of boiled water

Towel

jan.17.blog.3

It really is as easy as it sounds like it’s going to be! Just pop the herbs into a bowl of freshly boiled water, then lean your face over (not so close that you scald yourself…), lay the towel over your head and breathe deeply. You can stay here for 5 to 10 minutes, before wiping your face off with a cold, damp cloth to close up those pores again. For best results, follow up with a refreshing, toning spritzer and moisturiser.

Posted on — Leave a comment

Make your own – Hair Shine Treatment

I don’t know about you but the miserable winter we’ve been having has left my hair in a complete mess. Luckily, this super easy to make hair shine treatment is great for split ends, brittle hair or even just a bit of a pick me up on a girly night in.

Ingredients:

10g rosemary leaves

10g dried chamomile flowers

100ml fractionated coconut oil

This makes enough for one treatment for very long hair or several if you’re rocking a pixie cut! You’ll have to make it up a bit in advance – just pop all of the ingredients into a jar or bottle and leave to infuse (I only left it overnight but if you can manage a week then even better). When you’re ready to use it, strain through a sieve to get rid of the herbs and work the oil into your scalp and hair. Wrap your hair in clingfilm (or a hot towel if you’re feeling fancy) and leave for a minimum of 30 minutes. If your hair is particularly dry then it can be left in overnight, but be warned – this is not a good idea if your hair leans toward being greasy! Wash the oil out with shampoo; you might need to do this a couple of times to get all of the oil out. Voila! Enjoy your soft, shiny, revived hair. If you’d like to know more about why this works, check out this article about the benefits of coconut oil for your hair.

Posted on — Leave a comment

Herb of the Month – Horseradish

So it’s been a while since we’ve written a blog (we’re slacking, I know!) and in the meantime winter has crept in properly. In our house that means stews, pies and roasts – as often as possible! There is a certain someone in our household, who shall remain unnamed (Paul), who can’t seem to eat any of these things without an appropriately large selection of condiments. Our herb of the month has been chosen in his honour – horseradish.

The best known, and possibly most delicious, use for horseradish is of course in condiment form as horseradish sauce (we personally like horseradish mustard). It’s a really simple sauce, made from grated horseradish root and vinegar – and it’s really easy to make at home. Not many people make it themselves though; in fact sales of horseradish in a bottle began in 1860 – making it one of the first convenience foods available. It remains popular throughout the world, with several varieties available, including with beetroot – yum…

Horseradish has other uses though, including medicinally. It can be used to treat urinary tract infections, kidney stones, bronchitis, rheumatism, sciatic nerve pain, gout and even colic. Though as always, consult your doctor before use!

Even better, horseradish is amazingly easy to grow at home. It will do best in a nice sunny spot, but this is the UK so it can also make do with some shade! It’s a perennial and best grown from a cutting. They can pretty much be planted and left alone, with possibly a little water if we (miraculously) have a dry spell, to be harvested the next year. When harvesting, you’ll want to make sure you remove the entire root and then replant only what you want – it can easily take over your garden if left to its own devices. It has to be said though, once you’ve got access to the fresh stuff, you won’t want it from a jar again!

Posted on — Leave a comment

Make your own – Bath Milk Bag

So it seems summer is over (what little we had of it!) and autumn is swiftly taking over. My cure all for those end of summer blues has always been a good long soak in the bath! This fantastic recipe for easy peasy bath milk has been a godsend for me – perfect to help you unwind.

Ingredients:

100g milk powder

5 – 10g dried flowers (I used calendula, the colour seemed fitting for autumn!)

2-4 drops essential oil (orange for me, but you can use anything that will help you relax)

muslin bags or squares of muslin and a length of thin ribbon

bath-milk-step-1

Method:


In a bowl, add the essential oil to the milk powder and stir thoroughly. It’s important to make sure that the essential oil is completely mixed in, with no clumpy bits.

bath-milk-step-2

Then add your flowers and once again mix thoroughly.

bath-milk-step-3

That’s really all there is to it! Pop your bath milk into a muslin bag, or if using muslin squares then place a tablespoon of mixture in the middle, bring the four corners together to form a pouch and then seal with the thin ribbon. Leave a loop of ribbon to tie the bag below the tap while you run your bath, so that the water runs through the mixture.

bath-milk-bag

Enjoy your soak in milky, aromatic goodness!